
International
Labour Organization
 Your
health and safety at work
Your
health and safety at work
INSTRUCTOR'S GUIDE TO THE MODULES
What is in this Module
These Modules have been developed to help you, the trainer, teach essential information on occupational health and safety to workers. You can use these Modules to teach workers from any workplace where basic health and safety information and training are needed. The issues covered in these Modules are areas of concern in many workplaces. Providing information on these topics through training classes or any other means will increase awareness and knowledge about hazards in the workplace and help workers protect their health and their lives. The phrase “he or she” is used throughout these Modules in order to refer the material to all workers.
II. Who should receive training on health and safety?
Although these Modules have been developed for training workers, in reality health and safety training is important for everyone in the workplace from senior management to the rank and file. You can use these Modules to provide training to:
III. Who should teach these Modules?
With proper training, any motivated worker educator, health and safety representative, shop steward or worker can teach health and safety information to others. |
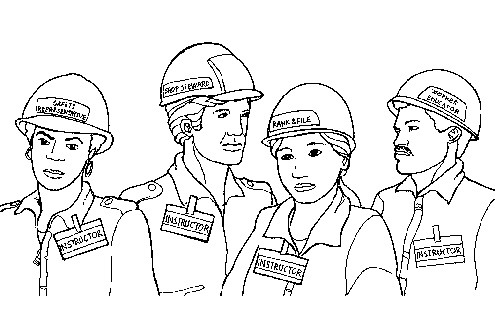 |
These Modules are intended for the use of instructors such as:
You do not need to have a background in health and safety to teach these materials to others, but some experience is desirable. Previous experience as a trainer is also desirable but not necessary.
IV. Topics covered in the Modules
The following is an overview of the general content of each Module in this collection.
Each Module follows the same format and contains the following sections:
VI. Using these modules in a training course
A. Adapt the Modules to the needs of the target group
In order to make the course as relevant as possible to the target group (the participants), it is recommended that you address the specific concerns of the trainees in your class in addition to the known or suspected hazards in local workplaces. If there are many issues to address, you may be able to deal with only the high priority known or suspected hazards.
It is suggested that, if possible, you do a “needs assessment” prior to the class. You can use a questionnaire to ask trainees several weeks before the class about their individual health and safety concerns, or ask them in person if possible. Alternatively, you can always ask trainees about their specific concerns at the beginning of the course.
Once you have the trainees' input, try to integrate the specific needs or problems identified by the trainees and your local laws, regulations, etc. with the content of the Modules. For example, if your class consists of agricultural workers, the Module Chemicals in the workplace would probably be more relevant to the hazards in their workplaces than the Module Noise at work. Your “needs assessment” may yield a list of chemicals with which trainees work and which concern them. Your role could be to collect information about those specific chemicals as well as information on any local or national standards/regulations for the same substances. From there you could integrate the information you collect with the Module Chemicals in the workplace, or combine it with the Modules Legislation and enforcement, Using health and safety committees at work, etc. — wherever you think it will fit.
Here are some suggestions on ways to adapt the materials.
Substitute examples that are in the Modules with the trainees' own experiences.
Obtain information about a specific chemical that you know is used in a number of the trainees' workplaces (a particular solvent or pesticide, for example), then devise an exercise or discussion about that chemical.
If these Modules are not available in the local language, than you will need to adapt the materials. The first choice is to translate the material into the local language prior to the class. If that is not possible, then the second choice is to extract and simplify the most important points from the Modules you need to use in preparing the course in the local language. (Some of the most important points for trainees will be identified through your “needs assessment”.) From there you can use the existing exercises or develop your own activities for use in the course.
Because the information and exercises in these Modules are based on written material, it is recommended that you assess the general literacy level of the trainees in your class. Since literacy is sometimes a sensitive subject for people, it is important that you do not identify to the other participants those trainees who may have limited literacy skills. Try to make use of the variety of skills available in the whole group. This is recommended for any class situation and is particularly helpful if literacy is a problem in the group. You can make use of the available skills in the class by doing the following:
ask for a volunteer from each group to take on various responsibilities in group activities (asking for volunteers is preferable to assigning tasks to individuals);
- ask for a volunteer from each group to read instructions aloud to the group (trainees who are comfortable with reading may be more inclined to volunteer to read out loud than participants with limited reading skills);
- ask for a volunteer from each group to take notes for the group and report back to the whole class the results of the group's activities (those with better writing skills may be more likely to volunteer);
you can read the instructions for exercises aloud to the class, explaining the different tasks for each activity;
try to obtain local graphics to use instead of the written material — exercises based on pictures should be appropriate for any reading level.
Whenever possible, try to get slides and a slide projector or photographs to use with the Modules. Slides or photos showing real workplaces and a variety of hazards are more meaningful than graphics. You may want to ask trainees to bring to the class slides or photos of their own workplaces if they have them. If you have your own slides or photos you are encouraged to develop exercises tailored to them.
Adapting these materials to your own region, to local languages and to the workers' needs will make the information more relevant to the trainees' own jobs and lives.
B. Encourage active class participation
Try to involve trainees in the learning process. |
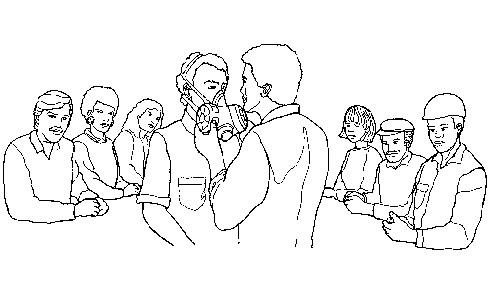 |
It is generally accepted by educators today that adults learn best when they are actively involved in the learning process and when they are encouraged to discuss their own experiences in the classroom. This type of learning is generally called “participatory” or “trainee-centred learning”.
This is in contrast to traditional teaching methods which are generally teacher-centred, where the teacher is seen as the person with the “knowledge” and new information, where the participants sit and listen but are not actively involved in the class, and where the content being taught may not relate to the experiences of the participants. Some advantages of this approach are that:
Participatory learning asks the trainees to give information as well as receive it. In this way, trainees are encouraged to “teach” one another information from their own experiences as workers. After all, it is the participants in your class who know best about the health and safety problems in their own workplaces. This knowledge makes the trainees excellent resources for ideas on ways to improve working conditions. Utilizing the experiences of the trainees in your health and safety class will help them to learn and retain important information.
Make your training classes participatory by doing the following:
This “learning by doing” is likely to be more effective than “learning by being told”. The collective self-reliance of participants will be encouraged by this training method. Also the skills they will be using as union activists or members will be developed at the same time. As a result, it is to be expected that the confidence participants feel in themselves will be markedly increased by the end of their training course. |
C. Teach priority issues first
It is recommended that you teach the Modules according to priority, i.e. teach the most important issues first. For a general health and safety course, it is recommended that you use all of the Modules. If you do not have enough time to use all of them, or if the target group has specific needs, then you may want to choose only the topics of highest priority. For example, if noise is not a problem in most of the trainees' workplaces, then you might decide to leave out the Module Noise in the workplace. (You can identify the trainees' priority health and safety concerns by doing a needs assessment, explained in section A above.)
D. Suggested guidelines for teaching
It is up to you to decide how you want to teach the text in these Modules to best suit the needs of your target audience. Be as creative as you like! Only the exercises are designed as structured activities and even these can be adapted/changed as necessary. For example, you can use the exercises to teach core content instead of at the end of a Module for reinforcement.
Here are a few suggested guidelines for teaching these Modules.
1. Carefully read over each Module and each exercise before you use it in the class.
2. If you like the different participatory methods used in the exercises then you may want to use them while teaching the core of the Modules. Try to come up with your own participatory methods to use as well.
3. It is recommended that you develop lesson plans or a teaching outline for each Module prior to the class. When preparing a teaching outline, decide what teaching techniques you will use to present the core concepts. Include in your lesson plan the module objectives, introduction, core of the text, points to remember, summary and exercises. (The outline at the beginning of each Module states the core concepts that are included in the Module.) Also include any additional needs and problems identified by trainees in the needs assessment. Try to use visual aids and practical examples whenever possible to reinforce the main points of your presentation.
4. For some exercises, it is recommended that you make copies of materials ahead of time if you have access to copying facilities. The materials recommended for a given exercise, such as a flipchart, markers, paper, etc. are described in the instructions for each exercise. (Note: For the exercise in the Module Legislation and enforcement, it is recommended that you try to obtain a copy of the relevant sections of your country's health and safety legislation prior to the class and make copies for the trainees. There are options suggested in the exercise in case you cannot get a copy of the legislation or in case no relevant legislation exists in your country.)
5. Build on these Modules by developing new materials or by trying new ways of teaching. For example, you could develop pamphlets, booklets, posters, etc. with core technical information you or the trainees extract and simplify from the Modules. You could try acting out some of the information, involving trainees in the role play. Another suggestion is to present information through the use of pictures. You will be the best judge of methods that will work for the particular mix of participants in your class, taking into consideration local factors!
Sample lesson planning sheet
1. Name of unit you are teaching:
2. Target group:
3. Time available:
4. Requirements:
CONTENT |
TEACHING |
TEACHING AIDS |
Objectives |
||
Introduction |
||
Core points of the text |
||
Points to remember |
||
Summary |
||
Exercises |
The following are some explanations and guidelines for using a variety of teaching techniques. All of these techniques have been demonstrated to be effective tools in workers' education.
There are a variety of ways to ask questions and some ways are better than others. It is best to ask questions that require trainees to analyse a problem, rather than asking questions that can be answered with a simple “yes”, “no”, or with just a few words. Questions should be addressed to the group, allowing the participants several seconds to think about their answers. You can call on a trainee by name to answer the question or wait for someone to volunteer an answer. If a trainee provides a wrong answer to a question, ask if anyone else has a different answer rather than immediately saying that the previous answer was wrong. However, it is important when dealing with technical information to make sure trainees get the correct answer to a question.
A check-list is a useful way for trainees to evaluate general or specific health and safety conditions in their own workplaces. You can provide the check-lists or help the trainees develop their own, either individually or in groups. Trainees can then take the check-lists back to their respective workplaces and apply them. If time allows, ask for feedback later in the course on how the check-lists were used.
These can be developed in the class individually or as a group activity. In filling out an action plan form, trainees think about and develop a strategy for taking positive action to change an unsafe or unhealthy condition in the workplace. If trainees fill out action plan forms in groups, it is best to group together trainees from the same or a similar workplace, if possible. You can provide the framework for the action plan form and ask trainees to fill in the questions, or you can ask them to create their own form.
Brainstorming is a technique used to encourage trainees to generate a wide variety of ideas. In brainstorming, there are no “wrong” ideas and no idea should be criticized. To start a brainstorming activity, state the problem or the topic in question. Then ask the participants to offer their ideas about the problem/topic. Participants can call out their ideas randomly or write their ideas down on paper. Someone (you or one of the class members) writes down the ideas on a flipchart (or large sheet of paper) or on a chalkboard so that everyone can see. When no more ideas are offered, ask if anyone has anything else to add. If no one says anything more, the brainstorming activity is over. Summarize and discuss all ideas pooled.
Make a map of your workplace. |
 |
A risk map can be created either as a small group activity or as an individual activity. In this activity, trainees draw a floor plan of their work area on which they indicate where particular hazards may be located. This is followed by a discussion of their floor plans. Trainees then develop strategies for action to address one hazard which they have identified as a priority problem. It is recommended that only one priority problem be addressed at a time — with a substantial plan for action developed — since addressing multiple hazards at once may seem overwhelming.

Small group work is one of the main educational methods used in workers' education. In this section you will find some answers to the main questions often raised about working with small groups.
What size should a small group be?
Experience suggests that the maximum number for a small group to work effectively is three to four participants. A group larger than that tends to break down into sub-groups of two or three persons. In groups with more than four participants, it is also easier for individuals to “drop out” of discussions.
Course activities should direct small groups to tackle problems, deal with tasks, and develop skills. Keeping the size of the group to three or four participants helps to achieve the objectives of the activities.
Sometimes you will want to use the option of asking participants to work in pairs. This method of working can be very useful for activities that require detailed attention, such as producing a leaflet or preparing a short speech.
What is the value of using small groups?
There are several good reasons for using small group work in workers' education.
How should the trainer work with small groups?
Your role can be divided into four distinct stages:
Stage 1. Setting the activity
Stage 2. Supervising the groups
Stage 3. Taking reports from small groups
Prompt groups to refer in their reports to any documentation you have distributed.
Stage 4. Summarizing reports and guiding the final discussion
This is also an opportunity to point out the links with earlier course activities and discussions, and also with future parts of the course.
The process of setting activities, supervising group discussions, and taking and summarizing reports enables you to help structure small group work.
The following points represent a check-list for occupational health and safety trainers. They are not listed in any particular order of importance, but are intended to provide advice to help you use discussion successfully in courses and to answer some of the questions that may worry you, e.g. what if everyone goes quiet?
Enable as many participants as possible to join in the discussion. Try to be aware of who has not spoken. Think of ways to encourage them to join in without putting them under pressure. For example, you could ask, “Is there anybody who has not spoken yet who wants to say something?”. Ask a specific question which you know the course participant can answer, e.g. “What safety problems do you have in your workplace?”.
Do not dominate discussion with you own opinions, or allow anyone else to do so. Part of the trainer's role is to chair and guide discussions informally. Encourage participants to listen to one another as well as to you. Keep your mind on how the discussion is progressing, and throw questions back at the group if the discussion gets stuck or starts to wander.
Do not be frightened of silences: they allow for thought, and for participants to make connections. Silence can also indicate that something is wrong, but there will probably also be other signs for you to pick up on if this is the case.
Discussion can take place in large and small groups. Dividing the class in small groups allows more people to speak in the time available and helps less confident participants get involved.
Define clearly for yourself and the participants the subject for discussion. Allow for flexibility but do not let the discussion get too far off the point. If new ideas arise which require separate discussion, make a note of them and plan to come back to them later.
Discussion brings out a range of views and attitudes, but it can also bring out differences of opinion. You may therefore have to cope with strong alternative views or clashes of opinion, and should be prepared for this.
Timekeeping is important and it is your responsibility to end discussions when you think it appropriate.
Prepare well for discussion but do not dominate it with your knowledge. Use your ideas and information to move the discussion along and help clarify points. You may also need to use your knowledge to encourage debate among the course participants.
Use students' names and encourage others to do the same. This will help the group to relax and draw together.
Listen carefully to what participants say. Do not assume it will be what you expect them to say. Concentrate on what is actually happening, not on what you planned to happen.
Try asking participants to lead or chair discussion sometimes.
If you are serious about using discussion as a training method, make sure you leave enough time for it. Discussion should be a key element of an occupational health and safety programme, not an afterthought.
Case-studies involve the use of a detailed description of an event, a situation, or a problem. Part of their value lies in the fact that case-studies make it possible to look at trade union issues without participants feeling they personally have invested a lot in the outcome of the discussions. This means that sensitive issues can be introduced into a course so that nobody immediately feels he or she has a position to defend or attack.
Common or quite basic issues can also be dealt with by using case-studies. You may wish to use this option to “warm up” the participants, getting them to begin thinking about a problem, before going on to complete a more detailed activity.
For whatever reason case-studies are used, two crucial ground rules should be kept in mind.
Case-studies can be based upon real events or be wholly imaginary. They can be used with small group discussion in which you may participate. This will be followed by reporting back and more general discussion and you may stay out of the discussions until this stage.
Small group discussion of case-studies can take more than one form. One option is to give the same case to all the small groups to consider. This can encourage the generation of a variety of solutions, ideas and opinions about the same issue. Alternatively, different case-studies but with a linking theme (e.g. workplace hazards) can be given to each small group. This allows more issues to be covered in the time available.

Constructing case-studies is a key skill you need to develop. However, you are not expected to work totally on your own to produce case-studies. The most important resource you have are the course participants. They will be your richest source of case-study material.
Using the methods encouraged in this manual, real events, situations and problems will be raised by participants throughout the course. You should develop the habit of noting down the essential points of those events which can usefully be written up as case-studies for future courses.
Another source of case-study material is written information, for example, newspaper stories, reports in union journals and specialist occupational health and safety publications. Material from these can be reworked to form case-studies. The disadvantage of this source is that you may not have all the information needed to construct your case-study, and therefore have to “invent” some elements of it. However, this is preferable to having to create your material completely from scratch, as this can lead to cases that sound artificial and unlikely.
One final word of warning. Resist the temptation to make your case-studies long and detailed. If you wish to look at an issue in some depth then use the problems and experience of the participants themselves. The activities used in the course should draw this out. This will enable the course to cover an issue in detail with the relevant knowledge and experience being available throughout the discussions.
Discussions of case-studies that are short (e.g. a paragraph or two in length) are a good way to begin consideration of an issue.
What is role play?
Role play is a trainee-centred training method that can generate considerable activity and interaction among course participants. Essentially, course participants are asked to act out a role in a particular workplace situation. The types of role play most commonly used in workers' education on occupational health and safety are:
1. Interviewing, e.g. a health and safety representative interviews a union member with a health and safety problem;
2. Negotiating, e.g. union representatives meet with management to negotiate about a health and safety issue;
3. Taking part in a meeting, e.g. a group of health and safety representatives meet to discuss and suggest action to tackle a health and safety problem.
Why is role play useful?
It is important to understand why role play can offer particular benefits when compared with other training methods. Some reasons for using role play are that:
Devising a role play exercise
The setting for a role play and the allocation of roles will depend upon the type of exercise being set up. For example, an interviewing exercise could be set up using groups of three:
* UNION |
* UNION |
* OBSERVER |
|
A role play based upon a negotiation could be set up using groups of five:
* 2
UNION |
* MANAGERS |
* OBSERVER |
|
As part of the preparation for role play it is important to group together those participants given the same role, i.e. all the managers, all the health and safety representatives, etc. This enables them to exchange ideas about how they will take on their role and clarify anything they are unsure of. Also it makes your job easier as it is quicker to brief three managers together than each of them individually.
Role playing can be a very dynamic method, with activities developing a life of their own. The outcome of role play can be hard to predict, but this should be seen as one of its strengths.
You must be clear about the educational value of role play to course participants. One objective should be to stimulate action and activity in the real world, as with all participant-centred training methods.
Ensuring role play is effective
Like any other course activity, role play must be used carefully. To increase the likelihood of success, you should keep in mind the following points:
VIII. Setting up your training course
Below are some suggestions for setting up a training programme using these Modules. When deciding how to set up your course, consider factors such as the time you have available, the time the trainees can spend attending the course, the specific needs of the participants, etc. Several course models are suggested below. You can choose one of the suggested models or develop your own.
When setting up your course, allow two to three hours for the teaching of each Module. You may want to use all of the Modules or just some of them. Similarly, you may want to use only certain sections of Modules, depending on your needs and the time available. The key is flexibility - these Modules are designed to be as flexible as you need them to be. Use them in any way that best fits your needs.
Allow more time in your course plan for the longer Modules, such as Chemicals in the workplace. Similarly, Modules with more exercises will need more time.
Include a ten-minute break after each hour of teaching - you will need it as well as the trainees!
So, for example, a two-hour session could include:
- 50 minutes of class time
- ten - minute break
- 45 minutes of class time
- 15 minutes for questions/answers, discussion.
A three-hour session could include:
- 50 minutes of class time
- ten - minute break
- 50 minutes of class time
- ten - minute break
- 45 minutes of class time
- 15 minutes for questions/answers, discussion.
If you develop new activities or exercises for teaching the Modules, consider how much time will be needed to complete them and add that to the overall programme time.
Always decide how much time you want to allow for discussions. Add that to the overall programme time.
Set a time-limit for both exercises and discussions. Make sure that trainees know in advance how much time they have in order to try to accomplish the objectives for an exercise or discussion.
It is recommended that you leave 15 minutes at the end of each session for any questions or discussion.
If you plan a class that begins in the morning and is scheduled to be longer than four hours, then you will need to allow time for a lunch break. A minimum of one hour is recommended but you will be the best judge of what is expected according to local practice.
Try to arrange for a worksite visit during your training course. This is a valuable way for trainees to apply what they are learning in the classroom.
Suggested course models
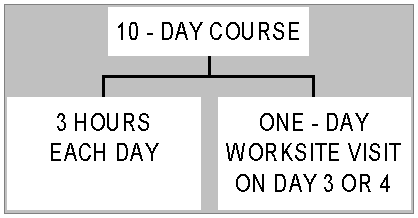
Model I
A ten - day course, for two to three hours each day, in which 11 Modules or priority sections of Modules are completed. One day is devoted to a worksite visit. It is recommended that the worksite visit be on day three or four of the course, not at the end of the course, so that trainees can apply new information to what they have seen at the worksite they visited and think of recommendations for improvement. The ten days of the course do not have to be consecutive.
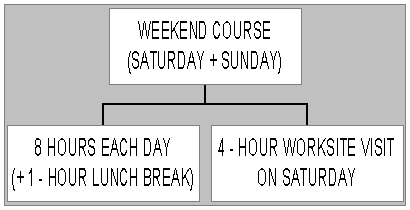
Model II
A weekend (two-day) course, for eight hours each day (plus a one-hour lunch break), in which only a priority Module (or Modules) is completed. Half a day is devoted to a worksite visit. This model could be useful for agricultural workers, for example, or chemical workers, where the Module Chemicals in the workplace may be the priority Module.
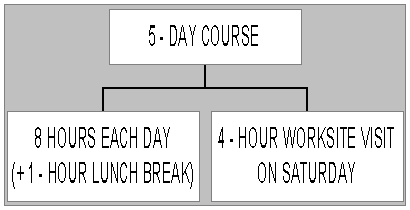
Model III
A five - day course, for eight hours each day (plus a one - hour lunch break), in which 11 Modules are completed. Half a day is devoted to a worksite visit.
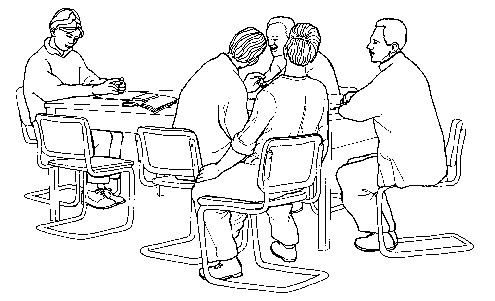
The aim in setting up the room is to maximize contact and communication between the participants. When arranging the room, consider the following:
Provide the following if possible:
However, you can certainly conduct a successful training course without all of these “ideal conditions”.
When setting up the classroom, make sure everyone can see and hear one another easily. A circular arrangement is one example. |
 |
Evaluation is not something just engaged in by the trainer when he or she asks the course participants how well the course went from their point of view. Evaluation does serve this purpose, but it needs to be seen in a wider context.
As a basic principle, evaluation should jointly involve the trainer and course participants. Just as the training course will have been based upon working in groups, active participation and involvement, evaluation also should be a collective process.
What is meant by evaluation is that collectively and individually everyone reflects upon the course in which they have been involved together. They ask questions about its relevance, what has been gained from it, its weaknesses and its successes. It is not something that happens after learning and development have taken place, but should be a central part of that process. So evaluation takes place as the course progresses just as hopefully those involved in the course are learning and developing from the first session to the last.
Evaluation should be seen as a responsibility shared between the trainer and course participants. Often evaluation takes place privately in individual minds, and this form of reflection should be encouraged. The wider value of personal evaluation comes, though, when it is made public and shared between all course participants. By this means every person contributes to a process of collective evaluation. At the same time, each participant may learn more about his or her own progress and development from the peer group.
The main objectives of course evaluation are:
Of these objectives the last two are relevant primarily to the trainer. The key point, however, is that evaluation should be seen as part of a longer process rather than as a one-off event.
What do course participants gain from evaluation?
What does the trainer gain from evaluation?
Additional stages of evaluation can also be identified. For example, a questionnaire concerning the course could be distributed to participants at the end. This could ask more detailed questions than is possible during the discussion-based activity. However, it must be stressed that this should supplement, and not take the place of, collective discussion. A sample course evaluation form is provided on the next page.
In some cases a written follow-up evaluation may be sent to participants some months after finishing their course. This serves the additional purpose of giving time for reflection upon the experience and what has been gained.
Personal action plans are also a useful form of evaluation, but of action which results from the course rather than the course itself. They enable participants to set themselves goals to be achieved over a given period of time. This is important as it creates a direct link between the course and the work/union situation to which participants are returning. Putting goals down on paper allows each individual to evaluate his or her progress in achieving them. Indeed, this is also a useful exercise for trainers to go through with regard to their future work.
Trainer's evaluation check-list |
Before the start, set your course objectives. |
During the first or second course session, find out what the participants expect and want from the course. |
Discuss with participants whether course meetings would assist the training process. |
For each session/activity, check that the participants understand the aims and what they are expected to do. |
Consider having a review of progress so far midway through the course. |
Carry out a final evaluation at the end of the course. |
Sample course evaluation form |
|||
| 1. Did the course meet its objectives | |||
| 2. Do you think the course addressed your health and safety concerns adequately |
|||
| 3. Do you have any particular
health and safety concerns which you feel were not adequately addressed in the course? If so, please describe. |
|||
| 4. How useful was this course for you? | |||
| 5. Do you have any suggestions for future couses? If so, please explain. | |||
X. Where to obtain more information
If you would like more detailed information on workers' education teaching methods, you can either purchase the following books from ILO Publications, International Labour Office, 4 route des Morillons, CH-1211 Geneva 22, Switzerland, or contact the ILO Bureau for Workers' Activities at the same address through your national trade union centre:
Workers' education and its techniques. |
A workers' education
manual |
Workers' education in action. |
Selected articles from Labour
Education. |
Crane, S.; Doyle, M.: |
“Evaluation and
workers' education: |
The following is a list of organizations you can contact if you need more information on occupational health and safety issues:
European Foundation for
the Improvement of Living
and Working Conditions
Loughlinstown House
Shankill
Co. Dublin
Ireland
Food and Agriculture Organization (FAO)
Via delle Terme di Caracalla
00100 Rome
Italy
International Confederation of Free Trade Unions (ICFTU)
Boulevard Emile Jacqmain, 155
B-1210 Brussels
Belgium
International Programme on Chemical Safety
World Health Organization
Avenue Appia
CH-1211 Geneva 27
Switzerland
International Register of Potentially Toxic Chemicals (IRPTC)
UNEP/Palais des Nations
1211 Geneva 10
Switzerland
Pesticides Action Network (PAN)
Africa:
(Anglophone) Environment Liaison Centre International
PO Box 72461
Nairobi
Kenya
(Francophone) Environnement
de
D�veloppement du Tiers Monde
BP 3370
Dakar
Senegal
Asia:
c/o IOCU
PO Box 1045
10830 Penang
Malaysia
Europe:
23 Beehive Place
London SW9 7QR
United Kingdom
North America:
965 Mission St.#514
San Francisco, CA 94103
USA
Pesticides Education Centre
942 Market St., 7th floor
San Francisco, CA 94102
USA
United Nations Environment Programme (UNEP)
Information and Public
Affairs
PO Box 30552
Nairobi
Kenya
Tel: (254 2) 230 800 or 520 600
Fax: (254 2) 226 886 or 226 890
UNEP - Industry and Environment Office (IE/PAC)
Tour Mirabeau
39-43 Quai Andr� Citr�en
75739 Paris CEDEX 15
France
World Confederation of Labour (WCL)
33 rue de Tr�ves
B-1040 Brussels
Belgium
World Federation of Trade Unions (WFTU)
Branik, Branicka 112
140 00 Prague 4
Czechoslovakia
Workers' Health International Newsletter
c/o Hazards
PO Box 199
Sheffield S1 1FQ
United Kingdom
World Health Organization (WHO)
Environmental Health
Programme
Avenue Appia
CH-1211 Geneva 27
Switzerland
World Meteorological Organization (WMO)
41, avenue Giuseppe Motta
1211 Geneva 2
Switzerland
World Resources Institute (WRI)
1709 New York Avenue, NW
Washington, DC 20006
USA
World Wide Fund for Nature International
Avenue du Mont-Blanc
CH-1196 Gland
Switzerland
International trade secretariats
Education international (EI)
Boulevard Emile Jacqmain 155
B-1210 Brussels
Belgium
International Federation of Building and Woodworkers (IFBWW)
20 rte de Pr�-Bois
PO Box 733
1215 Geneva 15
Switzerland
International Union of Food, Agricultural, Hotel, Restaurant, Catering, Tobacco and Allied Workers' Associations (IUF)
8 Rampe du Pont-Rouge
1213 Petit-Lancy
Geneva
Switzerland
Miners' International Federation (MIF)
109 Emile de Beco
B-1000 Brussels
Belgium
International Federation of Commercial, Clerical, Professional and Technical Employees (FIET)
15 Avenue de Balexert
1219 Geneva
Switzerland
International Textile, Garment and Leather Workers' Federation (ITGLWF)
8 rue Joseph Stevens
B-1000 Brussels
Belgium
International Transport Workers' Federation (ITF)
133-135 Great Suffolk Street
London SE1 1PD
United Kingdom
International Federation
of Chemical, Energy and
General Workers' Unions (ICF)
109, Emile de Beco
B-1000 Brussels
Belgium
International Metalworkers' Federation (IMF)
54 bis route des Acacias
PO Box 563
1227 Carouge
Geneva
Switzerland
International Graphical Federation
17 rue des Fripiers
Galerie du Centre (Block 2)
1000 Brussels
Belgium
Postal, Telegraph and Telephone International (PTTI)
36 avenue du Lignon
1219 Le Lignon
Geneva
Switzerland
Public Services International (PSI)
45, avenue Voltaire
F-01210 Ferney-Voltaire
France
The terms listed in this glossary are intended to assist the reader to understand better the information in these Modules. Fuller definitions of some of the terms can be obtained from other sources, such as the ILO Encyclopaedia of Occupational Health and Safety, or the ILO CIS Dictionary of Working Conditions and Environment.
Absorption: a process by which a substance may be incorporated or taken into the body (e.g. through the skin).
Accumulate: increase, build up.
Acute effect: an immediate, obvious response, usually short-term and often reversible.
Administrative controls: controls designed to limit the amount of time a worker spends at a potentially hazardous job.
Air monitoring: the sampling and measuring of pollutants in the air.
Biological monitoring: usually consists of blood and urine tests performed to look for traces of chemicals and biological indicators of chemical exposure.
Boiling point: the temperature in degrees Fahrenheit or Celsius at which a liquid boils.
Break down: weaken.
Ceiling limit: indicates the maximum concentration of a material that must never be exceeded, not even for an instant. In some countries these are required by law.
Chronic effect: an effect that usually appears a long time after the exposure occurred and persists over time.
Comply: obey (in the case of laws).
Concentration: the weight of a substance in a given weight or volume of material.
Contact dermatitis: a type of reaction (usually to a chemical substance) resembling an allergy which occurs every time the sensitized worker comes into contact with the irritating substance. Characteristic symptoms are red, blistered, itchy or flaky skin. The reaction is not necessarily confined to the place where the substance touches the skin: the symptoms can occur in other parts of the body as well. (See dermatitis.)
Continuous noise: constant noise.
Corrosive substance: material that can burn or destroy human tissue on contact and can cause permanent scarring or blindness. A corrosive substance may cause metal containers to weaken and eventually leak or collapse. Both acids and alkaline substances are very corrosive.
Decibels, dB or dB(A): the units in which the intensity of sound is measured.
Defence system: the body's natural defences which help to protect people against many hazards, and help the body heal itself.
Dermatitis: damage to the skin resulting from any irritating substances. Characteristic symptoms are red, blistered, itchy or flaky skin which usually disappear when the worker stops having contact with the irritating substance. (See contact dermatitis.)
Dose: the amount of a substance that is actually taken in by the worker's body. The dose depends on how much of the substance the worker is exposed to and how long he or she is exposed.
Ear protection: hearing protection, usually ear plugs or ear muffs.
Elimination: getting rid of (a specific hazard).
Emulsifier: a chemical that holds one insoluble liquid in suspension in another, such as oil and water.
Engineering controls: common control measures including isolation, enclosure and ventilation.
Evaporate: form a vapour.
Excessive: above the level of comfort.
Exposure: the process of being exposed to something that is around; exposure can affect people in a number of different ways.
Flammable liquids — LEL (lower explosive limit) and UEL (upper explosive limit): the lower and upper limits of vapour and air concentration, given as a percentage that can cause an explosion.
Flash point: the lowest temperature at which a liquid gives off enough vapour so that a mixture of the vapour in air in a test container will ignite.
Foetus (or fetus): the term used to describe the developing human baby from the second month after conception until birth.
General ventilation: ventilation designed to keep the workplace comfortable.
Hazards: dangers.
Housekeeping: keeping the workplace clean and organized.
Hygiene: the practice of principles that maintain health, e.g. cleanliness.
IDLH (Immediately dangerous to life or health): description of an environment that is very hazardous due to a high concentration of toxic chemicals or insufficient oxygen, or both.
ILO Convention: an international labour standard developed through the ILO tripartite system. ILO Conventions are comparable to multilateral international treaties — they are open to ratification by member States and, once ratified, create specific binding obligations. A member State that has ratified a Convention is expected to apply its provisions by legislation or other appropriate means as indicated in the text of the Convention. The government of the member State is required to report regularly on the application of ratified Conventions; the extent of compliance is subject to examination and public comment by ILO machinery; complaints about alleged non-compliance may be made by the governments of other ratifying States or by employers' or workers' organizations. Procedures exist for investigating and acting upon such complaints. Conventions that have not been ratified have the same value as Recommendations (see ILO Recommendation below).
ILO Recommendation: ILO Recommendations are intended to offer guidelines for action by member States. Often, a particular Recommendation will elaborate upon the provisions of a Convention on the same subject. Member States have certain important procedural obligations in respect of Recommendations — namely to submit the texts to their legislative bodies and to report occasionally at the request of the ILO Governing Body on the measures taken or envisaged to give effect to the provisions. Recommendations have no legal obligations.
Impulse noise: usually a very loud noise that occurs only once.
Industrial hygiene: the recognition, measurement and control of workplace hazards.
Ingestion: the process of taking a substance into the body through the mouth.
Inhalation: the process of breathing in.
Intensity of noise: loudness of noise.
Intermittent noise: noise that is periodic at regular intervals but not continuous.
Isolation: an engineering control in which a hazardous job is moved to a place where fewer people will be exposed, or a worker is moved to a place where he or she will not be exposed at all.
Latency period: the time period between the exposure and the first signs of disease.
Local effect: an effect on the part of the body where a hazardous substance comes into contact with or enters the body.
Local exhaust ventilation: suction - based ventilation system designed to remove pollutants from the air.
Material safety data sheet: (same as hazard data sheet and chemical safety data sheet) detailed information sheet on chemicals, generally prepared and made available by chemical manufacturers or projects such as the International Programme on Chemical Safety.
Medical surveillance programme: medical programme including pre - employment and periodic examinations which helps to identify early warning signs of occupational diseases.
Micro-organisms: germs.
Monitoring: in the workplace, close observation to determine whether an area is safe for workers.
Occupational: related to the workplace.
Occupational disease: any disease caused by exposures in the workplace.
Permanent hearing loss: hearing loss that cannot be repaired.
Permissible exposure limit (PEL):
1. Milligrams per cubic metre of air (mg/m3): This is the weight of the substance in a known volume of air. This expression is used for dusts, vapours and gases.
2. Parts per million (ppm): Another expression for the amount of substance in a volume of air or liquid. The concentration of the toxic substance is measured per 1 million parts of air or liquid. (To understand how much 1 ppm is, imagine one drop of blue dye in a pool of a million drops of water.)
Personal hygiene: the practice of principles that maintain personal health, e.g. personal cleanliness.
Personal protective equipment: equipment a worker wears as a barrier between himself or herself and the hazardous agent(s).
Potential hazard: something that may be hazardous.
Respiratory hazards: hazards to the body's breathing system.
Routes of entry: the different ways hazardous agents can get into the body.
“Safe” levels: levels of exposure to substances below which there will not be a health risk to workers.
Short-term exposure limit (STEL): the maximum concentration that must not be exceeded for a continuous 15-minute exposure period. STELS are required by law in some countries.
Substitution: replacing particularly hazardous chemicals or work processes by safer ones.
Susceptible: open to hazards, germs, etc.
Synergism: the term used when exposure to two chemicals at the same time produces a much more harmful effect than the sum of the effects of exposure to the individual chemicals.
Systemic effect: an effect that occurs anywhere in the body once an agent hazardous to health has entered.
Target organs: those parts of the body that particular chemicals always affect. For example, lead affects the central nervous system (brain and spinal cord) but is stored in the bones where it accumulates with further exposures. Therefore, the target organs for lead are both the central nervous system and the bones. Other target organs for different toxic substances include the heart, lungs, kidneys and liver.
Temporary hearing loss: short-term hearing loss, usually characterized by ringing in the ears and a feeling of deafness.
Temporary threshold shift: an effect producing temporary hearing loss that can result from short-term noise exposure.
Threshold limit value (TLV):
1. Milligrams per cubic metre of air (mg/m3): This is the weight of the substance in a known volume of air. This expression is used for dusts, vapours and gases.
2. Parts per million (ppm): Another expression for the amount of a substance in a volume of air. The concentration of the toxic substance is measured per 1 million parts of air. (To understand how much 1 ppm is, imagine one drop of blue dye in a pool of a million drops of water.)
Substances with high TLVs, such as freon, are not very toxic. Substances with low TLVs, such as ozone, are very dangerous in even small amounts.
Time-weighted average (TWA): exposure levels for an eight-hour work shift are calculated using time-weighted averages. Using the TWA system, if an employer exposes workers to levels below the PEL for part of the day, it is legal to expose those workers to levels above the PELs for the remainder of the day provided the time-weighted average is below the limit.
Toxic substance: a poisonous substance that can destroy life or injure health.
Vapour: tiny droplets of liquid suspended in the air.
Vapour density: the relative density or weight of a vapour or gas compared with an equal volume of air. If the vapour density of a substance is less than one, it will tend to rise in air; if the vapour density is greater than one, it will fall in air. Substances with high vapour densities will collect in the bottom of tanks.
Vapour pressure: a high vapour pressure indicates that a liquid will evaporate easily. Materials with high vapour pressures can be especially hazardous when they are being used in an enclosed area or in an area with poor circulation.
Volatile: a term often used to describe a liquid that evaporates or vaporizes easily. This is important to know because air concentrations can build up quickly when the material is used in its liquid form.
Wet-method: spraying water over a dusty surface to keep dust down, or mixing water with the material used to prevent dust from being created.
